NSTextField validation
Swift
You want to sanitize user input before it gets into your model.
Input validation can be brute force – you validate and set each field, or you can use Cocoa Bindings which will do both “automatically”.
Introduction
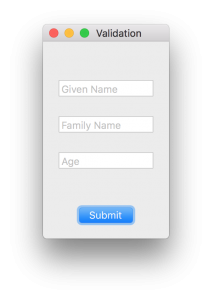
I’ll start by setting up a simple UI. Nothing fancy; just a UIStackView with a few NSTextFields and an NSButton .
The submit button will get the values of each text field and assign them to model properties. For simplicity, the “model” will just be instance fields on the ViewController .
|
1 2 3 4 5 6 7 8 9 10 11 12 13 14 15 16 17 18 19 20 21 22 23 24 25 26 27 28 29 30 31 32 33 34 |
class ViewController: NSViewController { @IBOutlet var givenNameTextField: NSTextField! @IBOutlet var familyNameTextField: NSTextField! @IBOutlet var ageTextField: NSTextField! @IBOutlet var submitButton: NSButton! var givenName:String? var familyName:String? var age:Int = 0 ... @IBAction func submitAction(_ sender: NSButton) { self.givenName = givenNameTextField.stringValue self.familyName = familyNameTextField.stringValue if let age = Int(ageTextField.stringValue) { self.age = age } else { let pressedOK = displayAlert(messageText: "Invalid Age value", informativeText: "'\(ageTextField.stringValue)' is a bad number") Swift.print(pressedOK) } Swift.print(""" given:\(self.givenName ?? "No given") family: \(self.familyName ?? "No family") age: \(self.age) """) } func displayAlert(messageText: String, informativeText: String) { let alert = NSAlert() alert.messageText = messageText alert.informativeText = informativeText alert.alertStyle = .warning alert.addButton(withTitle: NSLocalizedString("OK", comment: "OK")) alert.runModal() } |
displayAlert will show an NSAlert with the given texts. So, for age, there is some rudimentary validation.
Using Bindings
If you’re an iOS developer you may not know about Cocoa Bindings. It’s a bit confusing, but still powerful.
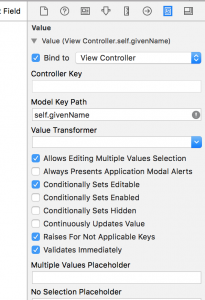
Let’s try setting a binding on an NSTextField . In IB, select the given name text field, then open the Bindings inspector. The first item in the panel is Value. Expand it to see the possible customizations. We want to bind the value of the text field to our model, so that whenever the text field changes, so does the model. Check the Bind to checkbox and select your ViewController . The you need to set the “model key path” to the ViewContoller's model field self.givenName. Finally, in that sea of checkboxes, enable the last one that says “Validates Immediately”. Remember the submitAction ? We grabbed the values of each text field and shoved them into the model fields. Binding will do that automatically now.
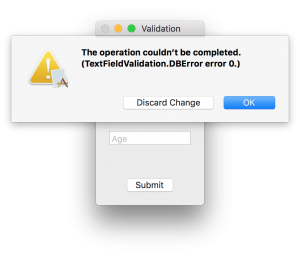
Run it and you get an error.
|
1 |
2017-10-26 10:12:04.433971-0400 TextFieldValidation[56852:1847010] Failed to set (contentViewController) user defined inspected property on (NSWindow): [ valueForUndefinedKey:]: this class is not key value coding-compliant for the key givenName. |
And since the
contentViewController is hosed, you see this:

Did I mention that Cocoa Bindings uses Key Value Observing (KVO)? You may have seen this in iOS when using Core Data, or maybe you’ve used observeValue(...) when using AVFoundation or other library.
The tl;dr is that KVO uses the Objective-C runtime to work its magic.
What you need to do is mark each model field with the keyword
dynamic . Swift 4 will also require you mark it with
@objc .
|
1 |
@objc dynamic var givenName:String? |
Or, if you’re using Swift 4, you can enable this on each field by using the @objcMembers annotation on the ViewController
|
1 2 |
@objcMembers class ViewController: NSViewController { |
One problem though. Swift’s optionals (e.g. Int?) cannot be represented in Objective-C, so you need to use Int. But using an optional works for String. Go figure.
Run it now and you’ll see your window in all it’s glory.
But, where’s the validation?
You want a function to be called when the user navigates away from your text field. That callback is:
|
1 |
override func validateValue(_ ioValue: AutoreleasingUnsafeMutablePointer<AnyObject?>, forKey inKey: String) throws { |
The
inKey parameter will contain the name of the model field to which the binding was made. Since you have multiple fields, a switch statement would be appropriate. To get the value you need to access the pointer’s pointee and cast to the model field’s type. Or simply cast to
String and validate on that. I check the age field to be just digits with the
String and a
CharacterSet (see github project). Once you have the value, you can perform validation on it. If it fails, you throw an Error.
For now, the error will be a simple custom enum.
|
1 2 3 |
enum DBError : Error { case textFieldValidation(String) } |
|
1 |
And the validation code looks like this: |
|
1 2 3 4 5 6 7 8 9 10 11 12 13 |
override func validateValue(_ ioValue: AutoreleasingUnsafeMutablePointer<AnyObject?>, forKey inKey: String) throws { switch inKey { case "givenName" : if let s = ioValue.pointee as? String { if s.count < 3 { throw DBError.textFieldValidation("Oh bloody hell!\nA title must be at least three digits long") } } // other cases for each model field default: break } } |
Enter fewer than 3 characters into the text field, navigate out of the text field (tab or mouse), and Cocoa will automatically display an alert or sheet. You get a sheet by default (along with layout constraint warnings). If you want an alert, in the Bindings Inspector, enable the checkbox “Always Presents Application Alerts”. Unfortunately, the message is crummy. It shows the type and rawValue of your Error . It would be nicer to actually display a message of your choosing.
Error protocols
The Alert displays an NSError's userInfo[NSLocalizedDescriptionKey] . So, you can create an NSError instead.
|
1 2 3 4 5 |
let errorString = NSLocalizedString( "A title must be at least three digits long.", comment: "validation: too short error") let userInfo = [ NSLocalizedDescriptionKey : errorString ] throw NSError(domain: "foo", code: 666, userInfo: userInfo) |
But damn, we want to use Swift’s
Error type and it has no userInfo.
Luckily, there is a Protocol named
LocalizedError (and protocol extension providing a default implementation) we can use to set the error description. We set the
errorDescription field to our message. If there are multiple cases in our
Error enum, use a switch statement. Or use a switch even if there aren’t multiple cases to make it easy to add them later.
Here we set the
errorDescription field to the textFieldValidation’s message that is set when it error is thrown.
|
1 2 3 4 5 6 7 8 9 |
extension DBError: LocalizedError { public var errorDescription: String? { switch self { case let .textFieldValidation(message): return NSLocalizedString(message, comment: "My error") } } ... |
There other fields are shown here, but aren’t used in the alert.
|
1 2 3 4 5 6 7 8 9 10 11 12 13 14 15 16 17 18 19 20 21 22 23 24 25 26 27 |
extension DBError: LocalizedError { public var errorDescription: String? { switch self { case let .textFieldValidation(message): return NSLocalizedString(message, comment: "My error") } } public var failureReason: String? { switch self { case .textFieldValidation: return NSLocalizedString("Beats me.", comment: "") } } public var recoverySuggestion: String? { switch self { case .textFieldValidation: return NSLocalizedString("Plug it in.", comment: "") } } public var helpAnchor: String? { switch self { case .textFieldValidation: return NSLocalizedString("someHelpAnchor.", comment: "") } } } |
Since I’m on an Error rant, you can also customize other NSError -like fields by adopting the CustomNSError protocol. If you use this instead of LocalizedError , you will see the domain and error code on the alert. If you adopt both, the LocalizedError takes precedence.
|
1 2 3 4 5 6 7 8 9 10 11 12 13 14 15 16 17 18 19 20 21 22 |
extension DBError: CustomNSError { public static var errorDomain: String { return "myDomain" } public var errorCode: Int { switch self { case .textFieldValidation: return 666 default: return 666 } } public var errorUserInfo: [String : Any] { switch self { case .textFieldValidation: return [ "line": 13] default: return [:] } } } |
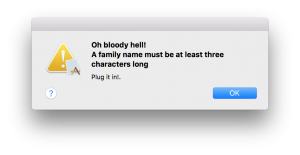
You can override the default alert to show a help button that will use your helpAnchor set in the Error , along with the Error's recoverySuggestion by creating an NSAlert with your Error .
|
1 2 3 4 5 6 7 8 9 10 11 12 13 14 15 16 17 |
func displayAlert(error:Error) { let alert = NSAlert(error: error) alert.alertStyle = .critical alert.showsHelp = true alert.runModal() } // and in validateValue, use it like this: case "familyName" : if let s = ioValue.pointee as? String { if s.count < 3 { // throw DBError.textFieldValidation("Oh bloody hell!\nA family name must be at least three characters long") let error = DBError.textFieldValidation("Oh bloody hell!\nA family name must be at least three characters long") displayAlert(error: error) } } |
Look nice. However, we’re trying to validate data before it gets to the model. For bad data, we need to throw an Error which then displays the default alert/sheet. If we pop up our alert and throw, the user sees two alerts. If we don’t throw, the user sees just our alert, but the bad data gets into the model. So what can we do? Live with the default alert/sheet. Sorry. But you can use this alert approach in other contexts.
Final thoughts
Wait a minute!
So, that’s an introduction for how this works. But is it appropriate for the ViewController to be doing this? In general, you don’t want huge controllers. And in a real program, you have actual domain objects. The appropriate place for validation is inside these domain classes. Why would any other class/struct need to know the internal details/rules of a domain class?
So, make a domain class that is KVO compatible and move the vaildateValue function to it.
|
1 2 3 4 5 6 7 8 |
@objcMembers class Person : NSObject { dynamic var givenName:String? dynamic var familyName:String? dynamic var age:Int = 0 override func validateValue(_ ioValue: AutoreleasingUnsafeMutablePointer<AnyObject?>, forKey inKey: String) throws { ... |
Then, in the ViewController, have an instance variable of type Person . This will probably be injected in real life, but go ahead an instantiate it in viewDidLoad() for now.
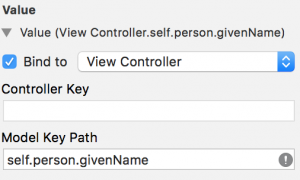
Finally, in the Bindings Inspector for each text field, update the Model Key Path to use the person field.
Groovy, huh?
Summary
You can use Cocoa Bindings to perform validation on user input before it is set on your model data.
There are several useful Error protocols that you can adopt to make the user experience better.

